

Disclosure: This post may contain affiliate links. Purchasing a product through one of these links generates a commission for us at no additional expense to you.
Are you confused by the WordPress editor?
I’ll be the first to admit: it takes some getting used to.
Things that you’ve always done easily might suddenly be difficult. For instance, you might be wondering:
- How do I add new blocks?
- How can I move blocks?
- How do I delete a block?
All of these questions and more will be answered in this WordPress editor tutorial.
- What is Gutenberg?
- How do I get the Gutenberg editor?
- It’s a block editor, not a text editor
- What are blocks?
-
How to use the WordPress block editor effectively
- How to add new blocks
- How to select & copy content
- How to move & rearrange blocks
- How to delete blocks
- How to transform block types
- How to customize block appearances
- How to place blocks side-by-side
- How to get even more blocks
- How to customize the block editor
- What if I want the classic editor back?
- You’re a block editor expert!
Before we get to the details on how to use the WordPress editor, here’s a quick explanation of why you may see different editors in WordPress articles online and what the “Gutenberg” editor is.
What is Gutenberg?
For more than a decade, WordPress used a text editor that looked like this now deemed the “classic editor”:

Then WordPress version 5.0 came out on December 6th, 2018, and switched all sites to the new editor, which they named “Gutenberg” famously after the first printing press.
Now that it’s been almost two years, the Gutenberg name is used less often as people simply refer to it as the editor or the block editor.
So, if you see anyone online talking about the “Gutenberg” editor, they just mean the editor that is now used on all WordPress sites (as opposed to the classic editor).
How do I get the Gutenberg editor?
You should have it by default. You do not need to “switch” to the Gutenberg editor to enable it.
If you visit a post or page in the admin dashboard, it should look like this:

If it doesn’t, then make sure you’re using at least WordPress version 5.0. You can check your WordPress version at the bottom right corner of your dashboard.

Additionally, check your Plugins menu to see if the Classic Editor plugin was installed, which would revert your site to the old editor. If it is installed, you can deactivate and delete it.
You do not need to install the Gutenberg editor plugin. That’s a beta plugin for users who want to try new features before they get included in WordPress core.
Now that you understand where the name “Gutenberg” came from and how to get access to the editor let’s talk blocks.
It’s a block editor, not a text editor
You can think of the block editor as a special type of text editor.
The main difference is that instead of all the text being stored in a single text area, each block is like it’s own text area.
This might seem strange at first, but it’s much better adapted to multimedia content, like this blog post, which is full of images and GIFs. Instead of placing images awkwardly into your text, you have blocks neatly separating images and paragraphs.
To fully appreciate these differences, you need to know exactly what a block is.
What are blocks?
A WordPress block is a single unit of content. That unit of content could be a paragraph, a heading, an image, or a variety of other content types.
For example, this paragraph you’re reading at this very moment is a paragraph block, and the heading above it was added with a heading block.
Every piece of content you add to a page in WordPress is contained in a block.
So a block isn’t a visual element – you don’t see rectangular blocks on the page – a block is just a term that means a unit of content. It’s a container.

While I think it’s extremely helpful to understand this terminology, I know it’s not the real reason you’re here.
What you really need to know is how to adapt your normal writing techniques to the block editor. It can be frustrating to struggle with simple things like copying and pasting when you’ve done it just fine your whole life.
What follows are all the workflow tips and tricks you need to be effective with the WordPress editor.
How to use the WordPress block editor effectively
There are a few things that make the block editor feel different from a normal text editor. Let’s tackle each of these one-by-one.
The first thing you need to know is how to add blocks.
How to add new blocks
Every piece of content you add is contained in a block, and there are four different ways you can add new blocks to your posts.
Use the Enter key
The experience of typing in the block editor is virtually the same as a normal text editor.
You can type happily away using the Enter key to create new paragraphs, but here’s the key insight:
When you hit Enter, you create a new block, not a new paragraph. The new block can become any kind of block (like an image or video). It only becomes a paragraph once you type words into it.

Using the Enter key is definitely the quickest way to create a new block, but the other methods have some merit too.
As of now, the Add block button is pretty confusing. I’m hoping they change it soon since they’ve already changed it a lot over the past two years.
If you hit the Enter key to create an empty block, you’ll see this black plus button on the right side of the editor:

Clicking that will reveal the block selector popup allowing you to insert any type of content you want.
I find this option confusing because it doesn’t always show up even when hovering your mouse between blocks. For that reason, I’d recommend mainly using the other button that’s always available at the top of the screen:

It gives you a much larger and easier to navigate window to select your block type.

If you’re new to block editor, take some time to navigate through the menu and familiarize yourself with the different types of blocks available.
Once you know what blocks you have at your fingertips, you can upgrade to the superior quick-insert method…
The quick-insert method
This is how I add blocks to my posts.
After you press the Enter key to create a new, empty block, type a forward slash “/” to open the quick select menu. Then begin typing the name of the block you want to add. It will show up right away in the menu.
While you can use your mouse to select a block, it’s faster to simply arrow up/down through the list and hit Enter again. This method of adding images and other elements is much faster than anything you can do with a traditional text editor. To add an image, you just type “/ima” and hit Enter. It’s my favorite part of the block editor.
Now that you know how to add blocks, let’s talk about selecting and copying them.
How to select & copy content
Selecting text in the block editor is a lot different than a normal text editor, but it works great once you know the best approach.
Here are the three ways to select text in the block editor.
Click-and-drag your cursor
The most common way people select text is to click-and-drag across the words.
This works fine within blocks, but you’ll find that if you want to select specific words between paragraphs, the editor automatically highlights the full blocks after you release your mouse.
Unfortunately, there’s no way around this, so you’ll need to select the full blocks and delete unwanted words after pasting.
If you’re selecting text to reorder it, hang tight because we’ll cover reordering soon.
The “select all” keyboard shortcut
The way “select all” works with the block editor is actually a lot nicer than a normal text editor.
Normally in a text editor, you would press cmd+a (ctrl+a on Windows) to select all the text in the whole article. If you try that in the block editor, it will only select all the text within the current block.
However, you can press cmd+a again to select all the blocks in the post.
Personally, I think this is a lot better because it lets you quickly select full paragraphs and optionally select the full text when needed.
How to select multiple blocks
There are two ways to select multiple blocks in the editor.
First, you can click-and-drag your cursor across the blocks, like this:

That works okay if you can see all the blocks on screen, but if you’re selecting a long range of blocks, dragging your cursor against the edge of the screen to scroll further can be messy and frustrating.
A better way is to click on the first block you want to select, scroll to the farthest block you want to select, and then hold down the SHIFT key and click on it, like this:
This technique will select both blocks you clicked on and all the blocks in between them.
How to copy your entire post
If you need to copy the entire contents of a post, you can use the double cmd+a shortcut, or you can use the Copy all content option found in the settings menu.

This is a great way to quickly move a post from one WordPress website to another.
With all that said, I know this still doesn’t address one of your main concerns: how to rearrange content. Let’s dive into that now.
How to move & rearrange blocks
As you just learned, copying & pasting is not the best way to rearrange your paragraphs. The block editor provides two ways to move blocks around the page.
Move blocks with the arrows
If you need to move a block a little way up or down the post, you can use the arrow buttons added to the toolbar:
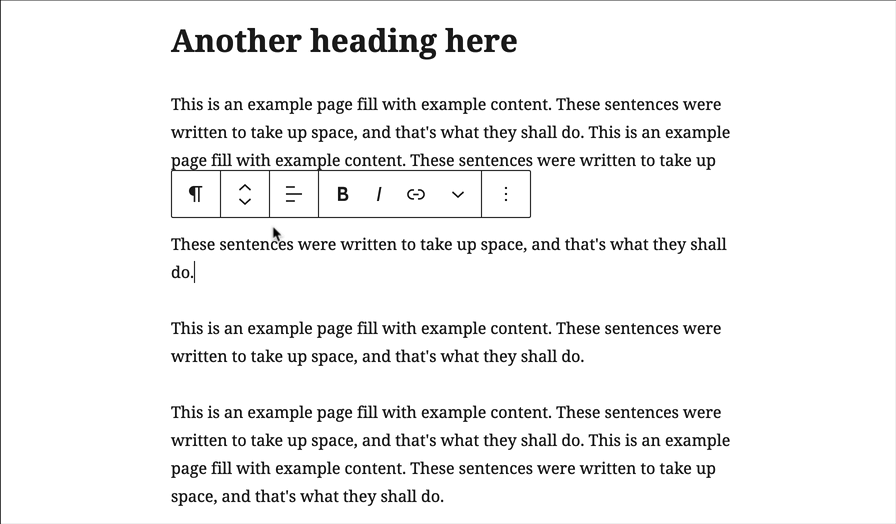
It’s a fast and clean way to reorder blocks without the mess of copying & pasting. This technique works for all types of blocks, including images.
Move blocks with drag-and-drop
If you need to move a block much farther, you may find it easier to drag-and-drop it than to click the “up” arrow a dozen times.
If you click-and-hold on the arrow icons, the interface updates so you can drag-and-drop the block into a new position.

You’ll see a blue line wherever the block is going to be inserted.
Personally, I find it tough sometimes to drop blocks into the right place, so I use the arrow buttons most of the time.
Move multiple blocks at once
If you read the tips above, then you already know you can hold down the SHIFT key to select a range of blocks. Once you have multiple blocks selected, you’ll see the toolbar displays above the first block only. You can then use the arrow buttons or drag-and-drop the whole group at once.
As of now, there is no way to select multiple blocks that are not consecutive.
You can still copy & paste
The arrow buttons are the easiest way to move paragraphs and images around your post, but you can still use copy & paste if you want.
To do this, you would use the cmd+a shortcut to copy the block’s content, then use cmd+x to cut the contents, and then create a new block with the Enter key and press cmd+v to paste in the copied content.
Creating, copying, and rearranging content covers most of the essentials. The last major technique you need to learn is how to remove blocks.
How to delete blocks
Deleting content is a part of creating content, so you need to know how to remove your blocks.
There are three ways to delete any block in the editor.
The delete keyboard shortcut
I always prefer keyboard shortcuts, so that’s what I’ll recommend first.
Click on any block and then press the following keys.
- Mac: ctrl + option + z
- Windows: alt + shift + z
This will remove the block immediately.
Delete by selecting the content
If you don’t want to learn the fancy delete shortcut, here’s another quick method to delete paragraphs and other blocks:
- Click somewhere in the block
- Press cmd+a (ctrl+a) to select the full content
- Press Delete/Backspace to delete the content
- Press Delete/Backspace again to delete the block
For an image block, you can simply click on the image and then press Delete/Backspace to remove it.
While slower, there are times when you may want to use the toolbar button to remove a block instead.
To delete a block this way:
- Click on the block
- Click the More options icon
- Click Remove Block

This method works for all block types.
Sometimes, instead of outright deleting a block, you want to change it to another type. The editor includes a transform option for that.
How to transform block types
One benefit of the block editor is that most blocks can be quickly transformed from one type to another.
Let’s say you’re blogging away furiously. There are sparks flying off your keyboard, and you don’t have time to fiddle with choosing block types, so you type your headings like normal paragraphs and continue onward. That’s no problem.
You can click on any paragraph block and then click the paragraph icon in the toolbar to reveal the block types it can be transformed to.

This works for image-based blocks too. For instance, you can transform an image into a gallery or “media & text” block.
A quick note on placeholders
Something I started doing to keep my writing speed up is to simply insert empty image blocks where I’ll later add my images.
Using the quick insert tip from earlier, type “/ima” and hit Enter to insert an image block, then press the Enter key again to keep writing your next paragraph. It leaves behind a nice placeholder where you’ll later upload your image.
How to customize block appearances
Unlike the old text editor, the block editor can give you lots of block-specific customization tools.
For instance, if you click on a paragraph block, you’ll see options to change the font size, color, and more in the sidebar.

Whenever you click on a block, the sidebar options will update to match the block you’ve selected.
Images contain entirely different results like the alt text and size controls.

If you want to get back to the main settings, you can click anywhere outside the blocks or click the Document tab in the sidebar.

How to place blocks side-by-side
A common frustration with the classic editor was how to place text and/or images side-by-side. The new editor makes this a lot easier.
If you want to put an image next to text, the best method is to use the Media & Text block.

If you want to place images next to each other, one option is to insert a gallery block.

This is especially useful for placing three or four images in a row.
Lastly, if you want to place multiple columns of text next to each other, you can use the Column block. When you insert it, you can decide the width of the columns, like this:

Managing the blocks without the Column lock can get confusing, but it’s certainly better than attempting the same layout in the old editor.
At this point, you’ve learned all the basics of how to use the WordPress editor. Next, you’ll learn a few more important techniques to get the most of the Gutenberg editor on your website.
How to get even more blocks
WordPress includes dozens of blocks, but you’ll likely need more to run your site.
For example, you’ll want to create a contact page, and that requires inserting a contact form into a page. There is no contact form block, so you’ll need to add one to your site.
There are two ways to get more blocks for your website.
Install new plugins
The most common method to get more blocks is to add new plugins to your site.
For instance, WPForms is an excellent form plugin which includes a drag-and-drop form builder. It includes a block that allows you to easily insert your forms within posts and pages.

These days, most plugins that add a new type of content to your site (forms/sliders/testimonials) will include a block.
There are also tons of “block plugins” that will load your site up with dozens of cool new block types. A few of the most popular options are:
I’d recommend getting used to the default blocks first, but when you’re ready to get more advanced, those plugins are awesome.
Add blocks from the block directory
WordPress 5.5 added a new “block directory.” I include it here to be comprehensive and because it will likely iterate and become more popular in the future.
However, as of now, I would NOT recommend you use it because:
- There aren’t many blocks available yet while there are tons of plugins that add new blocks
- The blocks have very few user reviews
- You can just install one plugin with dozens of blocks instead
- It’s harder to browse for new blocks than for plugins
- There’s no way to remove blocks once you add them (!)
And the only way you can even find them in the first place is if you search for a block and it returns no results:

This means that you can’t find new blocks for keywords like “image” or “embed” since they produce blocks already installed.
Overall, it’s a pretty strange and incomplete experience, so it’s best to wait until WordPress delivers this feature in a complete way before using it on your website. For now, install new plugins to add blocks to your website.
How to customize the block editor
The editor itself has a few customization options so you can change how it looks.
WordPress defaults to the Fullscreen display after each update, but you can return to the standard view by unchecking Fullscreen mode from the options menu to turn it off.

The one other change you might like is to click the gear button at the top right to hide the right sidebar.

If you enable Fullscreen mode and hide the right sidebar, it makes for a clean, distraction-free writing space.
What if I want the classic editor back?
After this post, I hope you’ve got a good understanding of how to use the block editor.
That said, you may not be sold on it. In which case, there are a few options if you want to disable the Gutenberg editor or avoid using it.
First of all, you don’t have to use the block editor. You can install the Classic Editor plugin.

This plugin is free, and the WordPress team committed to supporting it until 2022. Based on the reviews, you’d think it’s amazing, but it’s rated mainly out of spite (Gutenberg wasn’t well-received initially). Truthfully, it’s a mediocre text editor with nothing special to offer.
And here’s something else to think about…
You don’t have to write your posts in WordPress.
You can write your posts in Google Docs or any other editor you want, and then import them into WordPress. For editors like Google Docs, there are dedicated solutions for importing while retaining your formatting, but with other block-based editors, like Notion, you can simply copy & paste your posts into WordPress with all the formatting retained.
At the end of the day, WordPress is where you publish your content, but it doesn’t have to be the place where you create your content.
Now that you’ve learned so much about the block editor, I’m sure you’re ready to go use it, but I thought I’d share some additional perspective since it’s a hot issue.
You’re a block editor expert!
In this lengthy guide, you learned all the block editor fundamentals, including basic terminology, plus a little WordPress history.
You learned how to:
- Add blocks
- Copy and select blocks
- Delete blocks
- Move blocks
- Transform blocks
- Get new types of blocks
- And customize your blocks
The block editor takes some getting used to, but I hope this post has cleared up any confusion you’ve had thus far.
If you’re having fun learning more about WordPress and you think you’re ready to get serious about building an awesome website, I think you’ll love my free course:
Take the 7-day WordPress Mastery Email Course
It takes you beyond the basics so you can learn about customization, performance, and making money with WordPress.
If you enjoyed this post and it helped you understand how to use the WordPress editor, please consider sharing it with someone else before you go.
Thanks for reading!
