
Disclosure: This post may contain affiliate links. Purchasing a product through one of these links generates a commission for us at no additional expense to you.
Think you’ll buy WPForms?
In this review, I’ll give you a complete behind-the-scenes look at each and every feature of WPForms including over 3,000 words of analysis and 60 screenshots of the plugin in use.
What is WPForms?
WPForms is an excellent new plugin for adding forms to WordPress. Use it to create any type of form from simple contact forms to complete checkout form solutions.

The form builder includes dozens of field types and gives you total control over submission confirmations and notification emails.
WPForms Pricing
Before continuing the WPForms review, it’s always easier to understand a product once you know its pricing. Here’s a quick look at the pricing and feature breakdown.
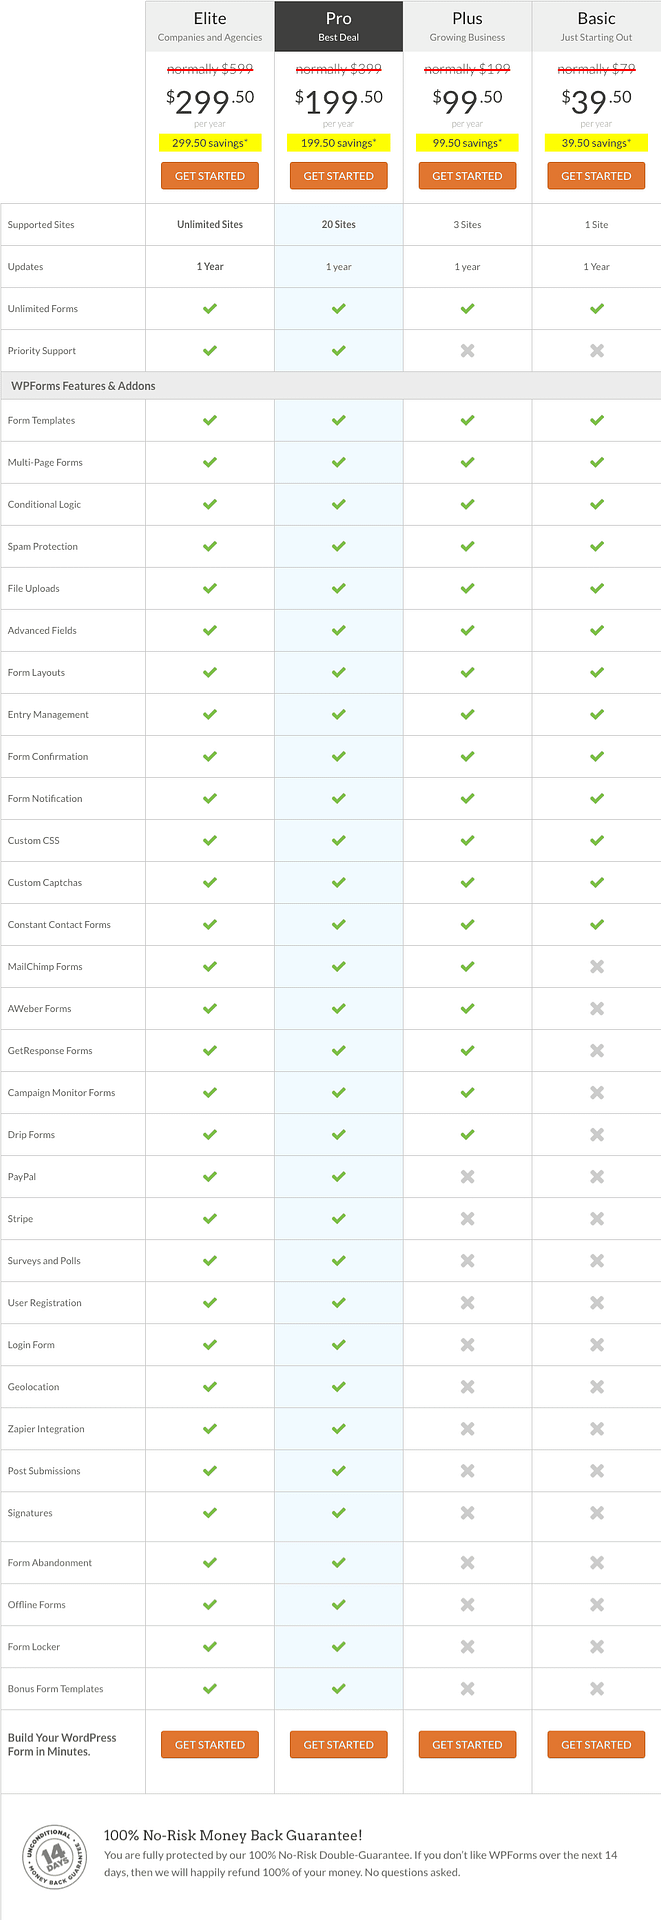
Got it?
Now let’s take a look at every feature offered by the WPForms plugin, starting with the core functionality.
Creating a form with WPForms
Once installed, WPForms adds a new menu item and a custom post type called “Forms.”

The “All Forms” page is just like the top-level Posts menu that lists all your posts.
Create a new form
Clicking the Add New button takes you to the form builder.

You can create a form from scratch, or start with one of six pre-made form templates:
- Contact
- Request a quote
- Suggestion / Feedback
- Donation
- Order
- Newsletter Signup
Of the six options listed, only the first three are included in the Basic package. I’ll cover each of the add-ons in detail later, but for now, let’s look at creating a simple contact form with the Basic package.
Add new fields
Selecting the contact form template will take you to this page.

As you can see, WPForms has prepared a form with the essential fields needed for a contact form.
Adding new fields is as easy as dragging-and-dropping them into the form from the sidebar.
Simple, right?
You can drag-and-drop any type of field into your form the same way. This lets you totally customize your form instead of just adding a simple contact form.
Edit a field
The phone field can be edited once it’s added to the form. To do that, I can click on the phone field and the sidebar switches from the Add Fields tab to the Field Options tab.

You can see above I’ve added a description and marked the new field as required.
There are also several advanced options to customize the field further.

These settings are very similar across the different field types.
Configure the form
Now that the form is complete, the settings can be configured.
General settings
The first of three sections in the Settings menu is the General settings.

These settings are mostly for internal use. You can name the form, change the submit button text, and add CSS classes to make custom styling easier.
Notification settings
When someone submits a form, the entry is saved in your dashboard. You can also choose to receive a notification at one or more email address.
The submission notification will contain the full information from the form including any fields you’ve added.

Using “Smart Tags,” you can automatically use the visitor’s email address as the Reply-To address so that you can respond directly to the notification email.
It’s also possible to configure multiple notifications so you could send a separate notification with different info to another address.
Confirmation settings
Once you’re satisfied with the email(s) you’ll receive, it’s time to configure the message the form submitter will receive.
WPForms’ options for confirmations are simple and straightforward. When a visitor submits a form, you can choose to:
- Display a custom message
- Redirect them to another page on your WordPress site
- Redirect them to an external webpage

Most of the time, you’ll just need to display a quick ‘thank you’ message, but it’s nice that you can send them to a page with more info instead.
WPForms does not send the form submitter an email after their submission.
Add the form to your site
The Basic package doesn’t include any Marketing or Payments add-ons, so I’ll cover those later. For now, it’s time to display the form.
Pressing the EMBED button at the top of the page presents this popup with a shortcode for embedding the form and a video tutorial on how to use it.

If you’ve never used shortcodes with WordPress before, you can follow our tutorial here.
Here’s how the form looks embedded into a plain contact page:

And here’s how the confirmation message displays after a successful form submission.

That’s the basic process of creating, configuring, and embedding forms with WPForms.
There are just a few more settings to check out, and then we can get to the add-ons for adding more functionality to the WPForms plugin.
View form entries
While you can receive any information you want in your notifications, the complete info from every submission is stored in the Entries menu.

Entries are grouped by form and include some familiar features from your inbox, such as:
- Mark as read
- Download/Export
- Star
WPForms global settings
There’s not much left to see now except for a handful of global settings for the forms. Here’s a look at the main settings available.

Without any add-ons installed, the Payments tab only has a currency selector, and the Integrations tab is empty. You can import/export forms between WP installs, and lastly, System Info contains general information about your site that the WPForms support staff may ask for when you contact support.
Additional Features
While that covers the bulk of the plugin, there are a few more features that set this plugin apart as a premium form builder.
Multi-page forms
You can make any form a multi-page form by adding a Page Break field.

This is incredibly useful for any long, intimidating forms. Breaking long signup processes into multiple pages increases conversion rates.
Here’s how it looks on the front-end.

File uploads
File uploads are another nice touch. These fields are just as simple to add as other fields and allow you to limit the file size and file type uploaded.

This saves you from needing another plugin to add file uploads to your forms.
Instant field validation
We’ve all used bad forms before. The kind that you complete and then after it reloads the page it tells you there was an error, but not which field… ugh!
WPForms does field validation really well. When a user submits a form, it will mark any fields with errors without reloading the page. Those errors then update instantly as the user corrects them.
WPForms Basic impressions
So that’s the basis of the WPForms WordPress plugin. It’s an easy and effective way to create an unlimited number of forms with any fields you want.
While the Basic package alone doesn’t have the ability to build email lists or collect payments, there’s still a lot more it can do with add-ons. Let’s tackle those now.
Use coupon code SAVE50 to get 50% off WPForms now.
Basic add-ons
These add-ons are available in the Basic ($39.50), Plus ($99.50), Pro ($199.50), and Elite ($299.50) packages.
This is where WPForms becomes extremely customizable and flexible. Let’s start with one of the most practical add-ons, conditional logic.
Conditional Logic
WPForms has this awesome add-ons menu where you can easily install and activate any add-ons available in your plan.

Conditional logic allows you to show fields based on a visitors response to another field. For instance, let’s say you add a drop-down selector to your contact form asking why they’re contacting you.

If a visitor is contacting you to report a bug in your product, you want to make sure they tell you which product. You can add another drop-down selector with a list of your products, but only show it if the reason for contact is a bug report.

You can use as many conditional fields as you want, and the matching doesn’t have to be “if this field is equal to that.” You can use any of the following comparisons:
- is equal to
- is not equal to
- contains
- does not contain
- starts with
- ends with
Furthermore, you can add more than one condition to show a form. Maybe if they have a bug report for your product AwesomePro in particular, you want to let them know that an update is on the way using an HTML field.
Conditional notifications
One more cool thing you can do with conditional logic is to send different notifications based on the field entries. Every notification gets the same conditional logic options at the bottom of the form.

This means you could send pre-sale questions to the sales department, bug reports to development, and general questions to the support staff.
Conditional logic adds more flexibility to WPForms than any other add-on, and I have to say, it’s my favorite part of the plugin.
Custom Captchas
The second and final add-on available in the Basic package is Custom Captchas.
WPForms includes reCAPTCHA support, but Custom Captchas lets you enter in your own questions. When you install the plugin, you’ll find a new Captcha option in the Fancy Fields section of the editor.

This field will automatically generate a math question the visitor has to answer correctly to submit the form.

Alternatively, you can enter up to two of your own questions. Just make sure the answer and its spelling are obvious. You don’t want to stump real people!

And that’s the last of the Basic add-ons. The WPForms plugin itself is extremely feature-rich, and the addition of conditional logic, in particular, makes it extremely flexible.
Now let’s take a look at how you can do even more through the use of the premium add-ons.
Plus add-ons
These add-ons are available in the Plus ($99.50), Pro ($199.50), and Elite ($299.50) packages.
The Plus package gives you four more add-ons all of which are used to build email lists.
Email subscription add-ons
Since the new add-ons are so similar, I’ve bundled them into one section. The Plus add-ons add support for the following four email services:
I’ll be covering the MailChimp here, but know that the functionality is the same across each of these add-ons.
MailChimp
Once you’ve installed the MailChimp add-on, you’ll find a new option in the Integrations settings page.

If you’ve ever added an integration like this to WordPress, it will be a familiar process of inputting your username and API key.
After integrating, MailChimp is available in the Marketing tab of the editor. You’ll use the Add New Connection button to connect the form to an existing list in your account.

Once a connection is added, you can configure the list integration.

This method of integration is awesome because you don’t have to choose a form to dedicate to email subscriptions. Of course, you can do that, but you can also add an email subscription to any form you want.
You can take the email address used in a payment form and add customers to an email list, or even include a checkbox asking if they want your newsletter.
Pro add-ons
These add-ons are available in the Pro ($199.50) and Elite ($299.50) packages.
The remaining nine add-ons are available in both the Pro and Elite WPForms packages. Elite gets you lifetime updates meaning you won’t ever have to pay to renew your license.
Payment add-ons
Two add-ons allow you to accept payments: PayPal and Stripe. Since both of these plugins are very similar in functionality, I’ll just provide an overview of the Stripe add-on.
Integrating Stripe
Activating the Stripe add-on adds the following fields to the Payment settings menu.

All four keys can be accessed via the settings in your Stripe account. There’s also an option to enter Test Mode which is great for testing purchases without using real currency.
When creating a payments form, you can use the order form template to get started. There are a few special fields you’ll need to include, such as the Credit Card field.

In the example above, the user selects the item they want to purchase from the drop-down menu which then updates the Total Amount below. All of the inputs in the Credit Card section are grouped as one field.
That’s pretty much all you have to do to start accepting payments with a form in WPForms. The one final step is to visit the Payments tab in the editor and enable Stripe payments.

You should also choose to send an email payment receipt, so your customers have a record of their purchase.
User Registration & Login
The User Registration add-on lets you create custom forms to let visitors register and login to your site. Once activated, you’ll find two new templates

Unlike some of the other form types, you need to use the user registration template to have access to additional settings. I’ll show you those in a moment, but first, here’s a look at what the default registration form looks like:

Since the registration template was used, there’s a new User Registration section available in the settings.

You can map each of the form fields to the user profile fields, such as username, password, and their bio.
You also have full control over whether you and/or the member get an email alert. Normally, you need a plugin to turn off new user notifications.
In addition, having a custom redirect and settings to add custom fields to new members is pretty cool.
The login template does not provide any custom settings, and simply provides a basic username and password field form.

Geolocation
Ever wonder where your form submissions are coming from?
That’s exactly what this incredibly simple add-on tells you.
There aren’t any new fields to add to your forms. Instead, this add-on displays a navigable Google Maps embed in the entry page for each submission using geolocation technology.

Post Submissions
Have you considered allowing guest post submissions on your site?
WPForms’ Post Submission add-on lets visitors submit posts without registering or visiting the WordPress admin. Like user registrations, you’ll want to make sure you select the Blog Post Submission Form template to get access to special new settings.

The form is quite extensive since it requires all the post fields in addition to the author info.

Choosing this template gives you access to the special Post Submissions settings tab.

It’s already setup to link the form fields to the post fields in the back-end.
You can even use this form to let visitors submit custom post types. For instance, you could have a custom post type called “Reviews,” and let visitors submit detailed reviews using custom meta fields to add star ratings and other info.
Signature
The Signature add-on is rather simple. It provides a new fancy field you can add to require a signature.

The field doesn’t have any unique settings to configure – it works automatically. Visitors can sign using their mouse or their finger on a touch-enabled device.
Signatures are saved as images that can be viewed in the form entry.
Form Abandonment
When a visitor adds items to a shopping cart and then leaves the site without checking out, we call this cart abandonment. WPForms has adapted this term to people who partially fill out a form and leave without submitting it.
The Form Abandonment plugin is awesome. It adds a simple new settings panel where you can enable the lead capture.

With this enabled, all partial entries that have either an email or phone entered will be saved as entries. This way, you can follow up with anyone who abandoned a form on your site.
Furthermore, you can automate the follow-up emails via the Notifications settings.

This means you can create a custom notification and deliver it automatically to visitors who abandon your form.
Zapier
Finally, we have the Zapier add-on which might be the most complex and exciting of all the add-ons.
Maybe I’m being lazy here, but I’m going to refer you to the step-by-step tutorial in the WPForms documentation for this add-on. Configuring it is pretty involved, so I’ll give you the big picture instead.
How does it work?
Zapier is used to connect services on the web. For instance, maybe you want to update a Google Sheet when you add a new user to your CRM or send a Tweet every time someone subscribes to your email list.
![]()
Okay, those may not be the best examples, but you get the idea.
The WPForms add-on lets you perform an action on any web service every time a form is submitted. That means you can send a Tweet, text someone, post in a Slack – anything you want with every form submission.
You may not have a use in mind for this right now, but it can be incredibly useful when a need arises.
WPForms Reviewed
So that’s my full behind-the-scenes review of WPForms WordPress plugin.
While I still use and love Gravity Forms, I’ve started switching to WPForms for new sites I’m making. It’s well-designed, easy to use, and has all the functionality I could ever want from a plugin.
Bottom Line
The Basic package is a great value as it gives you access to unlimited form building and the conditional logic add-on. You can get a lot done with that alone.
I would recommend the Plus package only if you’re going to use WPForms for building an email list. Otherwise, the Pro package is worth the upgrade as it gives you access to some incredibly powerful add-ons, such as post submissions, form abandonment, and the payment add-ons.
Lastly, if you think you’ll be using WPForms for years, then by all means, treat yourself to the Elite package.
Will you be grabbing a copy of WPForms? Is there anything else you’d like to see or know about it? Let me know in the comments below.
Use coupon code SAVE50 to get 50% off of WPForms now.
Thanks for reading! I want to let you know that I am an affiliate of WPForms. That means I get paid a commission at no additional cost to you if you sign up. I hope you find my WPForms review useful regardless of your purchase decision.
